
|
With the success of the smaller trebuchet fresh on our minds, we set out to make the next version. At first we debated how tall it should be, but eventually settled on 5 feet to make it easier to transport. I always had a love and knack for engineering. This new design would solve the biggest problem - a rickety frame. The first design (Plan A) used four angled support triangles, instead of two, to distribute the weight. I hoped that this would allow for the use of a heavier counter weight. Also, because of the size and portability, everything had to disassemble into manageable chunks. My design allowed for every piece to be taken apart and then easily reassembled. Everything looked great, and we were ready to start making it, but then I hesitated... I’m not rich and wood ain’t that cheap! The new plan would gobble up a frightening 150 feet of lumber, probably upwards of 200 feet. Add in a hefty steel axle, screws, and other miscellaneous parts and you're looking at a pretty expensive summer project. I was also concerned with the complexity of the design. It required many angle cuts, a problem we had faced while building the first one. If these weren’t done well, the whole structure would be weakened. I changed my design focus to one of construction simplicity. However, it still had to disassemble and be able to take a sufficient counter weight. After several nights of torment, the design finally started to take shape. I had done some additional research online and found that most trebuchets used a simpler two triangle support system and did quite well. I scrapped my 4-triangle plan and reverted back to a simpler design. And so, Version 2 - Plan B was born 3:00 a.m. August 5. I also incorporated several ideas that I had picked up while reading a paper called “Trebuchet Mechanics” by Donald B. Siano. Communications with some other trebuchet-ers steered me towards a throwing arm ratio of 4:1. I quickly recalculated all the lengths and angles and refined the new plan. After carefully examining the design that morning, I was very happy with it. I presented it to the team, who gave it a thumbs up. We wasted no time and got several 14’ planks from our local lumberyard. Power tools and screws helped speed up the work significantly. Within only a few hours of construction time we had cut all the pieces for both sides and fully assembled one. The next two days showed limited progress because of the absence of Victor, but Dan and I put in several hours a day and completed many of the smaller parts like the counter weight box, base beams, throwing arm, outriggers, slider, and sling. Another hitch along the way was finding a hefty main axle. The local hardware store had nothing bigger than 3/4” diameter steel dowel, and it cost $8.59. I called many other stores only to find higher prices and nothing suitable. Eventually a tip led us to Mark & Son, a metalworks in the next town. They were happy to assist in our interesting adventure. We got a steel rod 1.25” in diameter which was cut to our dimensions by a huge machine. This was a big relief and it only cost $8. Thursday was a big day. Victor was free and we assembled the second (and final) side. Dan was leaving for 3 weeks (!) the next day, so we quickly ran down to his house that night to cut out the big holes for the main axle and other holes with his drill press. We now had every piece cut and drilled. Friday came, but Dan was gone and Victor was tied up again. He had less than an hour free, but we worked hard and finished the outriggers. When he got home that night we put everything together and marveled at its magnificence. It stood an impressive 13 feet tall when the counter weight box was hanging down. The 6-foot sling was attached and we decided to give it a whirl (literally) The family came to see it, as well as several neighbors who had witnessed the machine grow. Since we were in a populated area, we decided to use tennis balls for safety. We must have fired about a dozen shots that night. With only 3 sand bags (perhaps 60 lbs.) for the counter weight we were still getting more than 100 feet. We looked forward to the trebuchet launch event planned for Sunday. Things weren’t quite ready when Sunday came around. We needed to fill more sandbags for counter weight, collect a supply of projectiles, and rig up a trigger system. We had found that holding and releasing the sling was troublesome. The force was quite intense and our arms tired quickly. This was unsafe and not nearly as fun. I had figured out a trigger Saturday, and built part of it before leaving to attend a party. The trebuchet was in its final form by 11 o’clock. We tested the new trigger system a few times and then packed it up for the launch party. We were heading to the town park.
L-DayIt was a glorious day. Perfect blue skies, a hot sun, and a cool breeze. We quickly assembled the trebuchet and aimed it a direction with plenty of open grass. We pulled out the American and English flags and attached them to the sides (We were hoping to use the patriotic defense if the cops came). We threw three sand bags (15-20 lbs. each) in our counter weight box and readied our projectile (a floor hockey ball). Family and friends gazed at the structure, sipping their drinks, as we readied the trigger pin and sling. Eventually all was set and the pin was pulled. The 9-foot arm quickly arced over the structure, whipping the sling around very nicely. The orange ball flew out with tremendous speed and traveled a respectable 150 feet. We quickly turned to the rock pile we had brought with us and used those as our projectiles. This increased the range significantly. We gradually increased the counter weight, eventually using all 8 sand bags and two 10 lbs. weights we had handy for a total of about 150 pounds of counter weight. Some shots went high (and left craters), while some went low (extremely fast, perhaps 300 feet per second). But we quickly figured out how it operated and we were getting good 45° launch trajectories. Our best distance was just over 350 feet. However, we greatly enjoyed firing the shorter ranged, but larger rocks (bigger than my fist and over 2 pounds in weight). Even these, however, reached distances of over 250 feet. With the full 160 lbs. of counter weight, some of the parts started to reach their threshold. After only a few launches with maximum weight, several items broke: one of the hanger arms cracked around the 1/2’ dowel that supported the box, the base beams had ripped of their runners, and the counter weight box has taken some damage to its paneling as the weight shifted during a firing. Time was up anyway, so we disassembled it. The parts that had broken were easily replaceable. I was happy that the sides had no problem with the forces exerted on them; they were rock solid the entire time. Also, the throwing arm, which I had some serious doubts about, survived.
Press Coverage
DownloadsThis is a small movie of the trebuchet firing. It gives you an idea of how it works an the force it produces. Keep an eye on the sling whipping around the arm. (3 seconds) trebuchet.mov (Quicktime, 540K) Due to popular request, a longer movie is now available. You can hear all the friends, family, and strangers adding in their comments and yelling the counting down for 5 different launches. (40 seconds) |
 Version 2 - Plan A 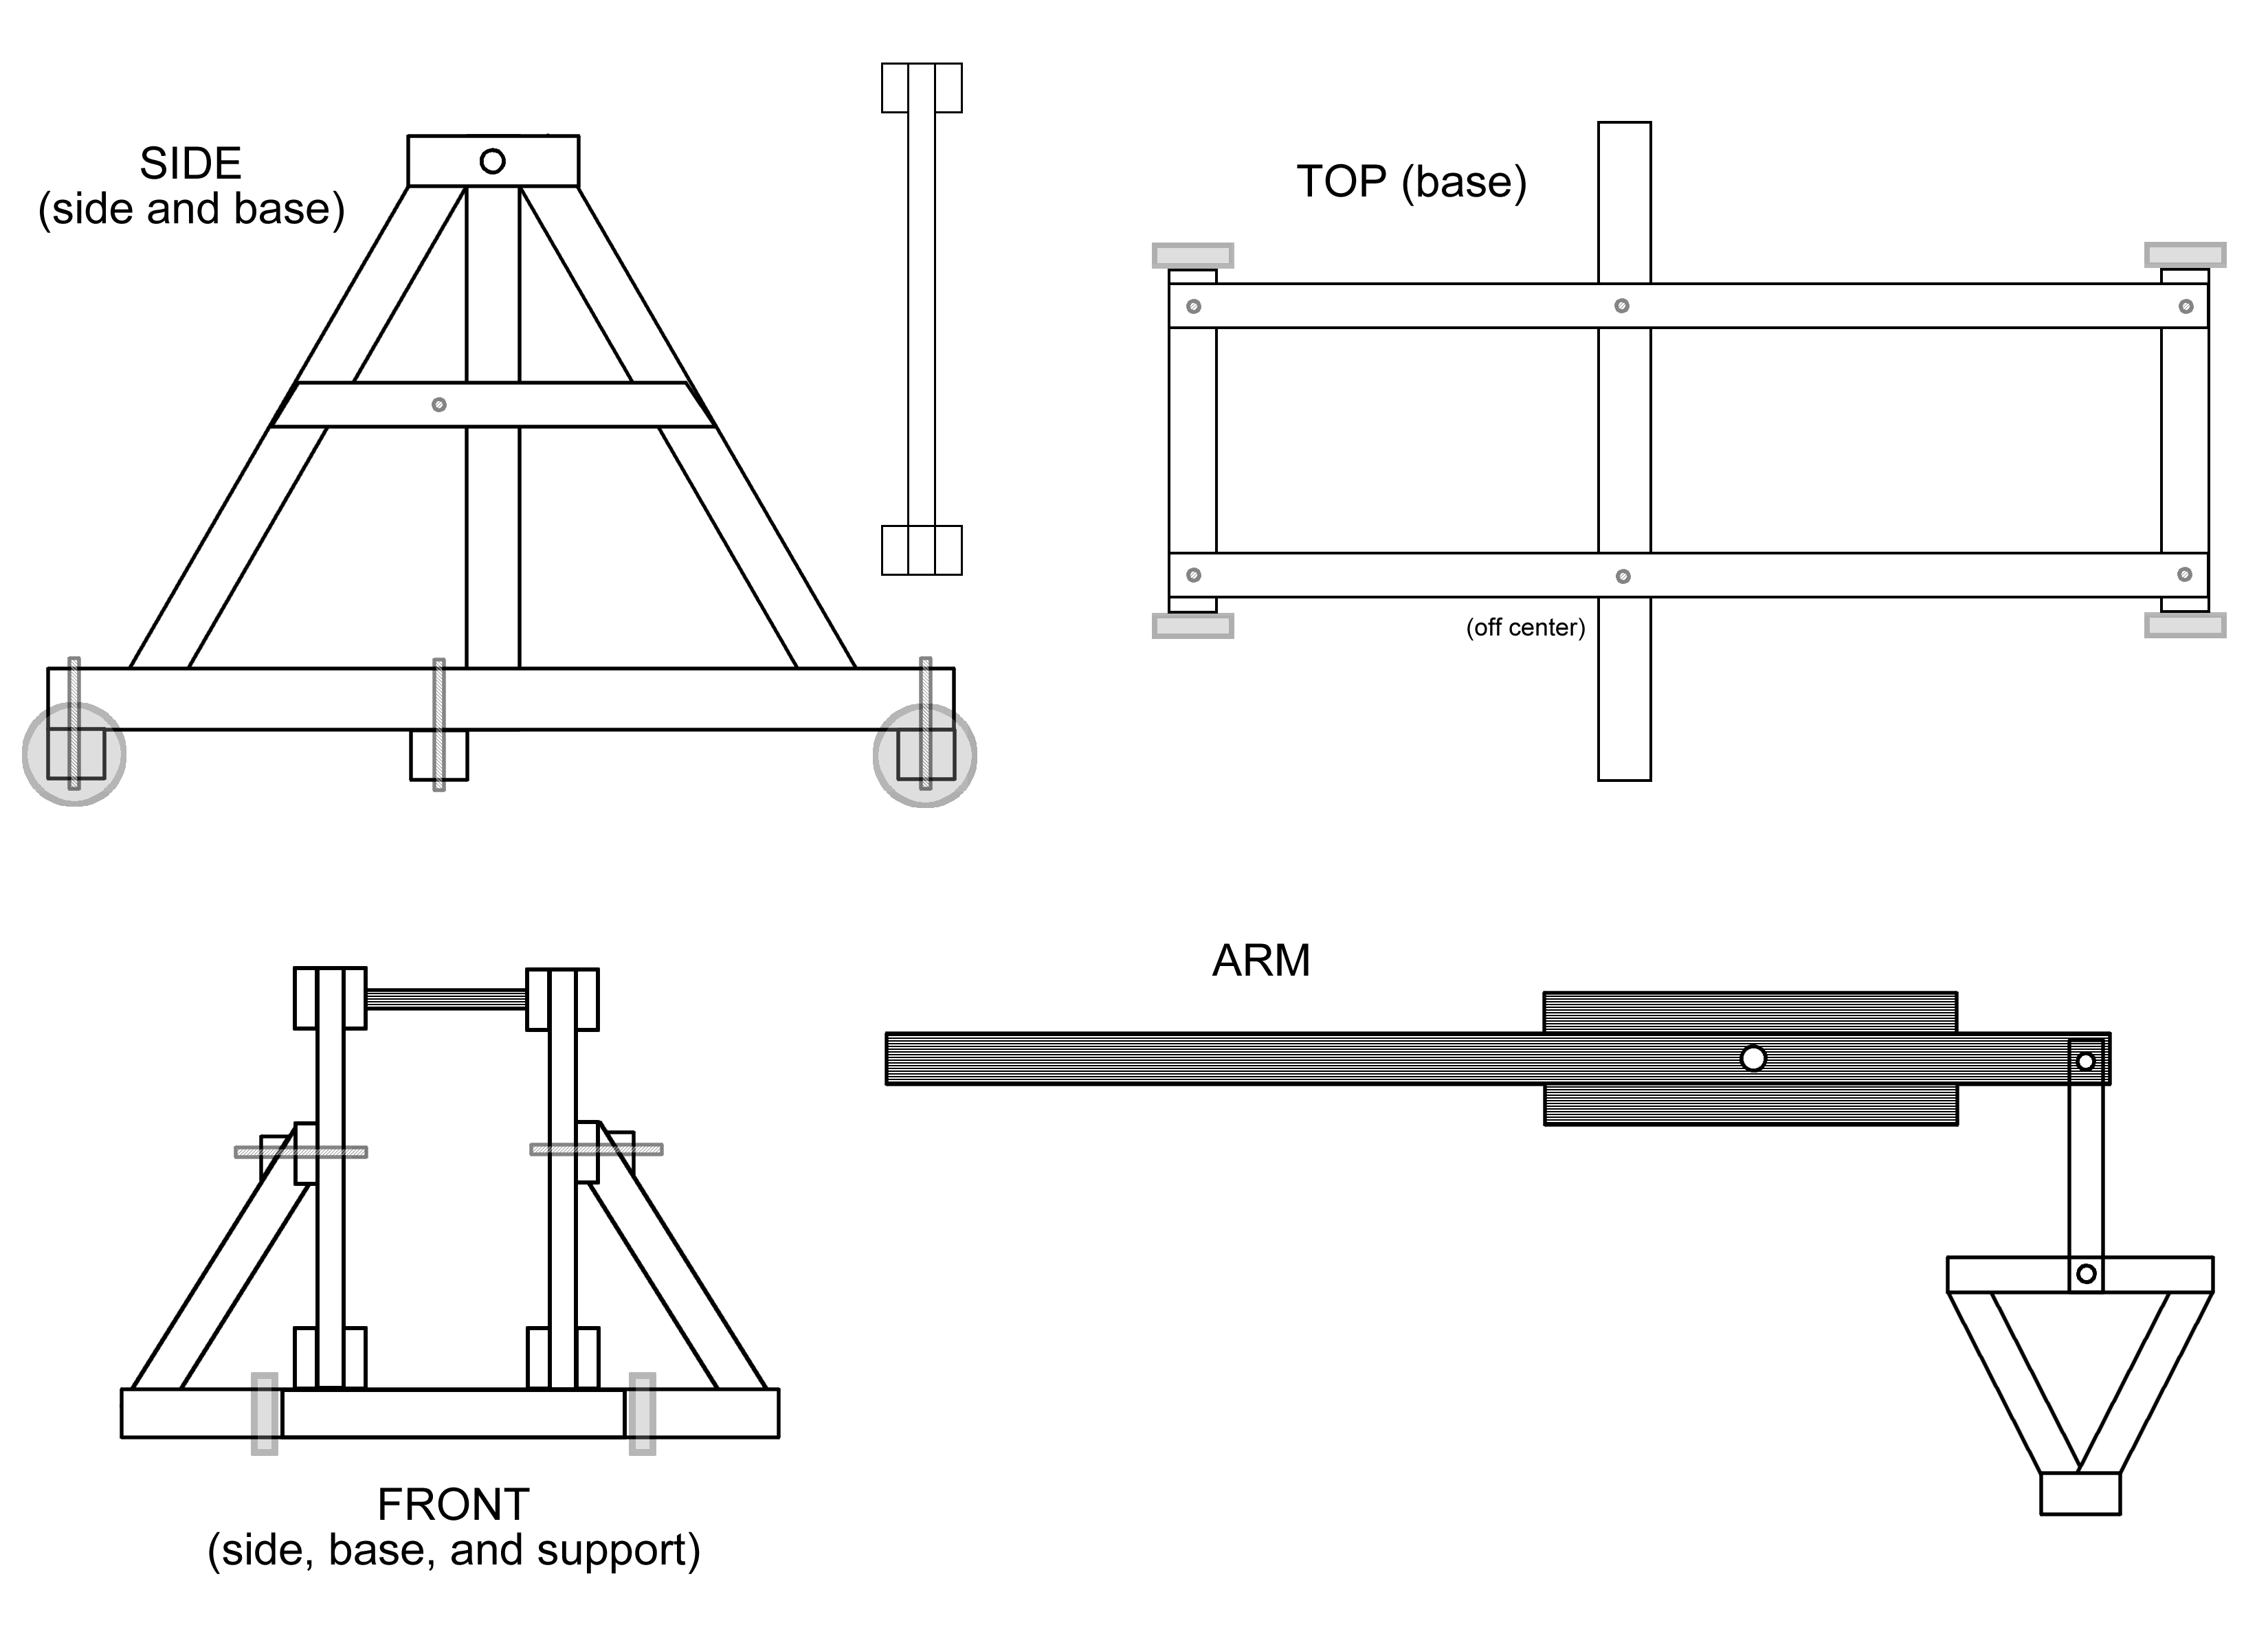 Version 2 - Plan B 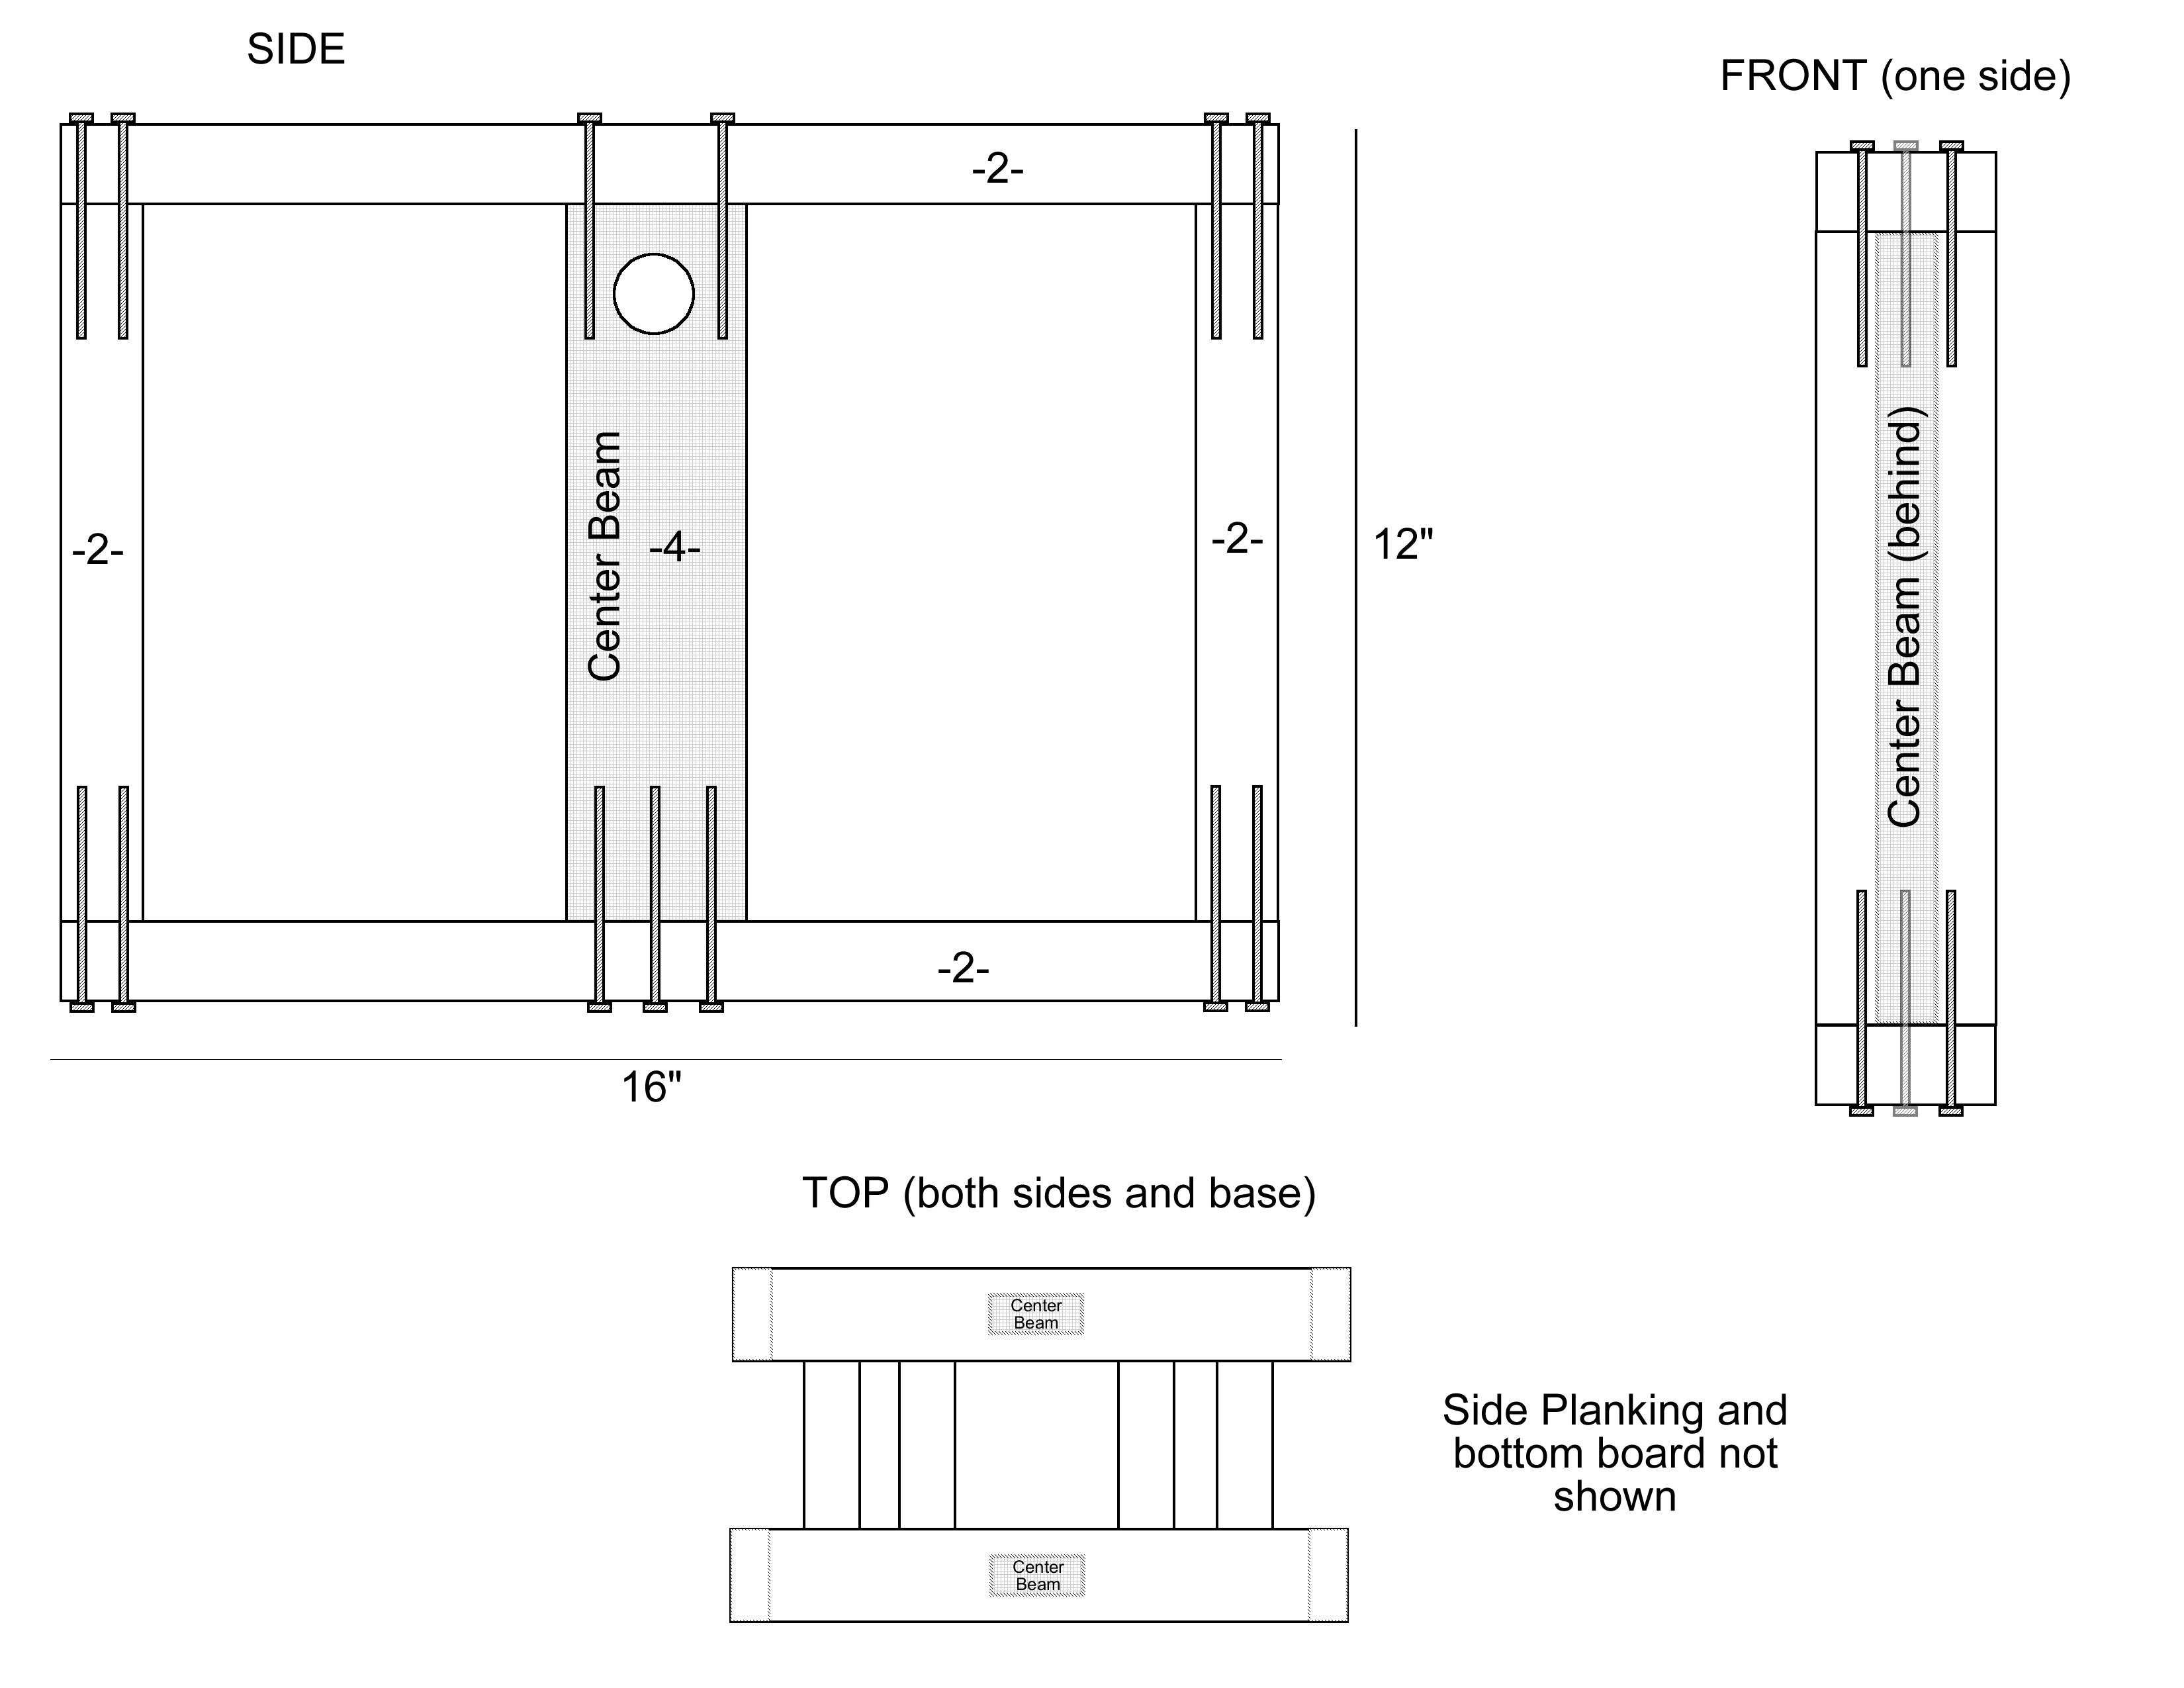 Counter weight box plans 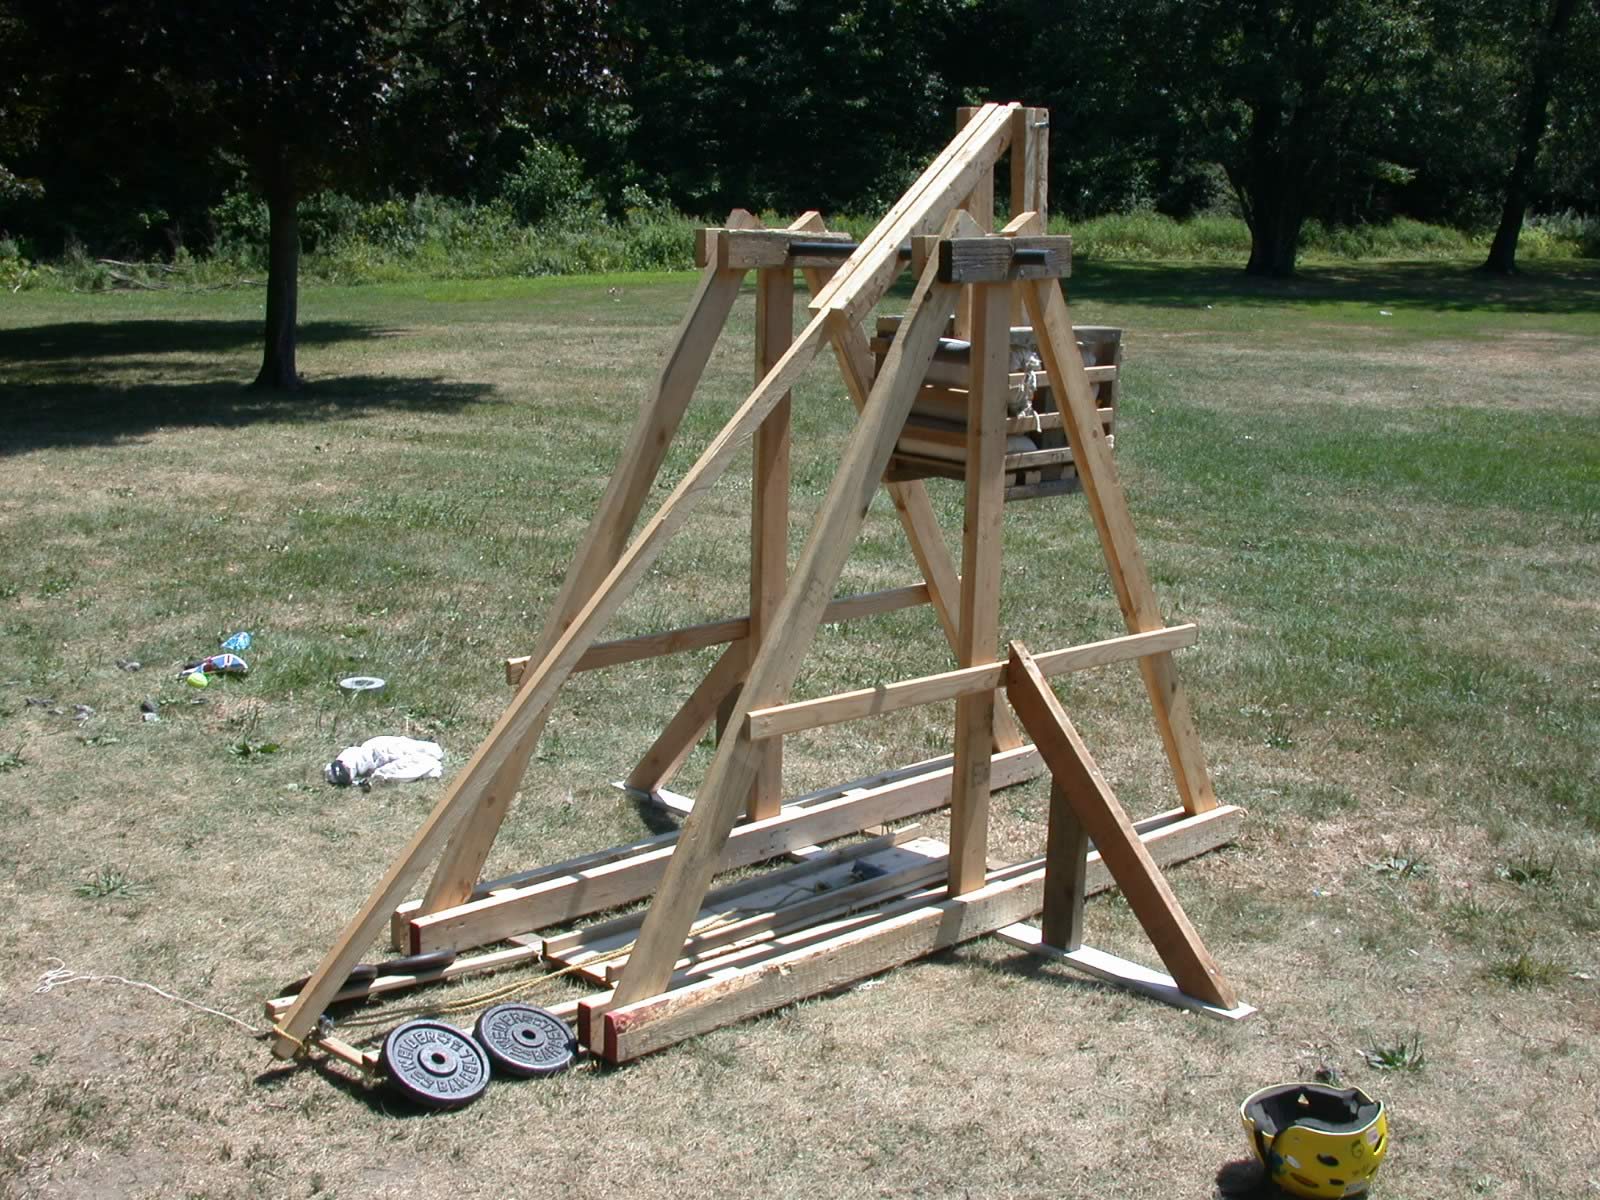 The trebuchet in final form on L-Day  The trebuchet in final form on L-Day 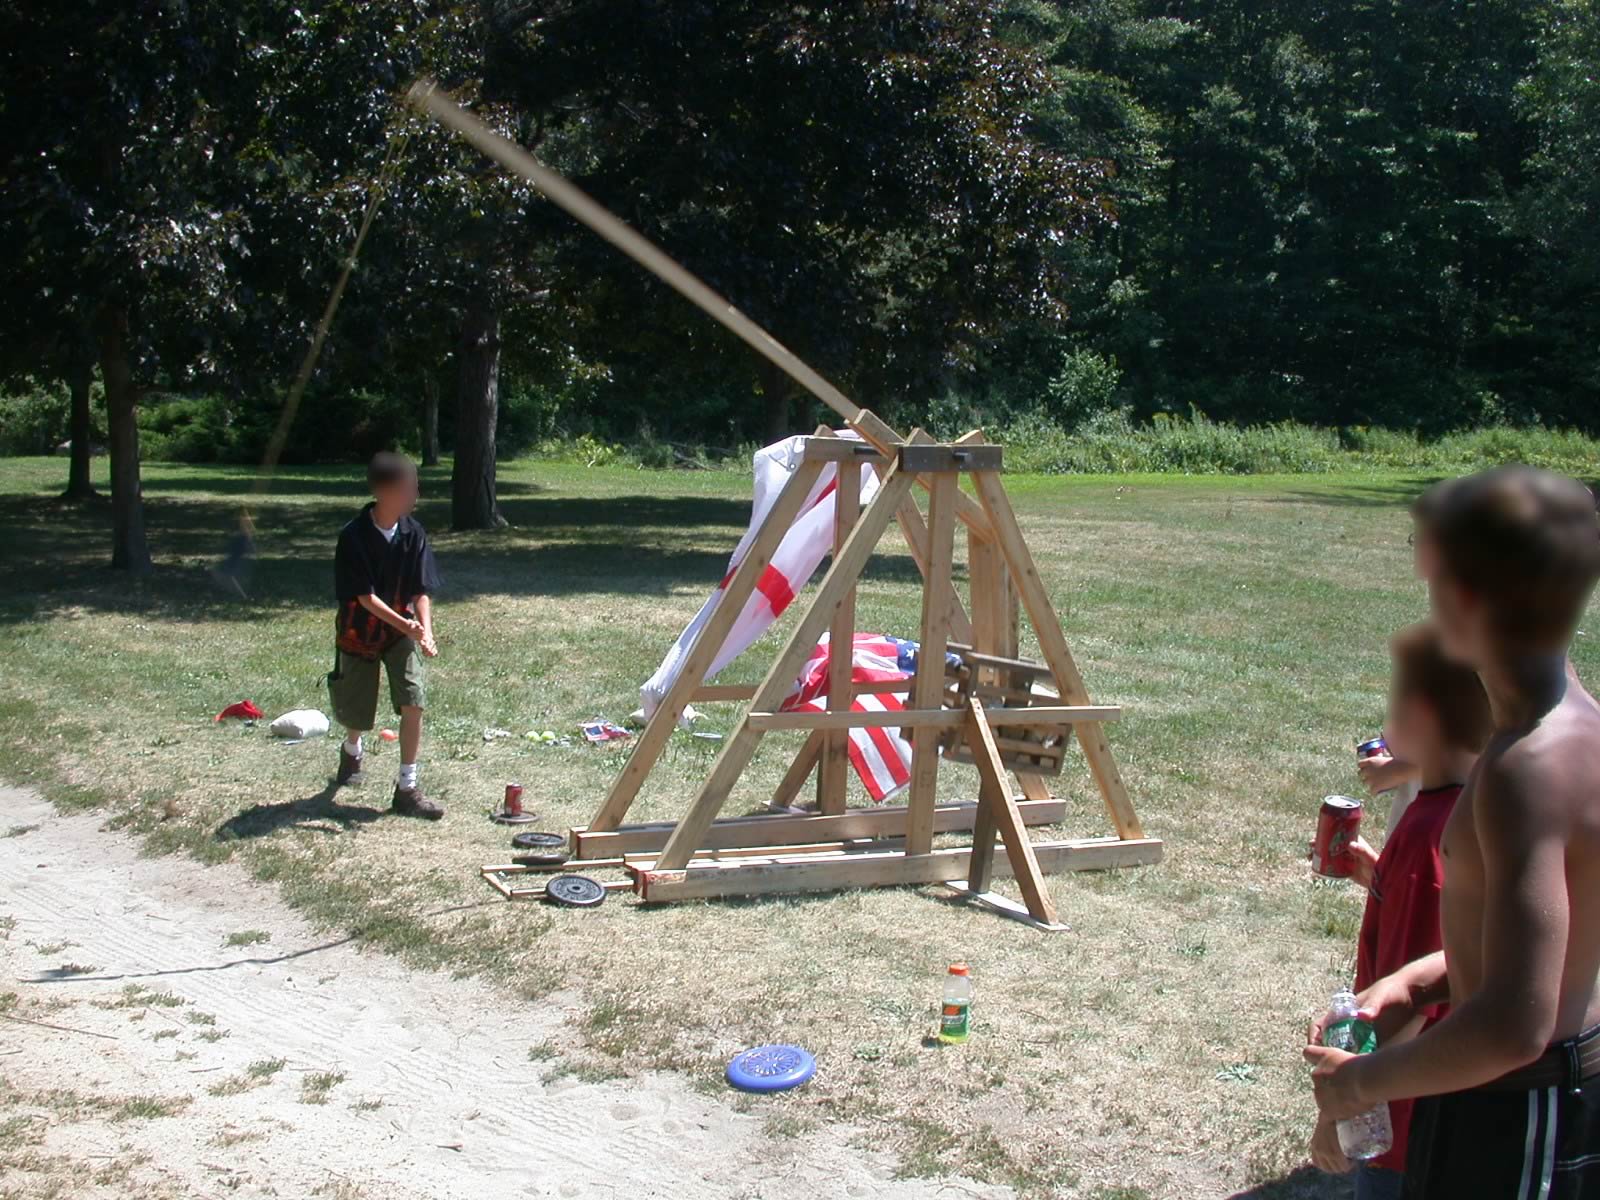 The trebuchet firing on L-Day 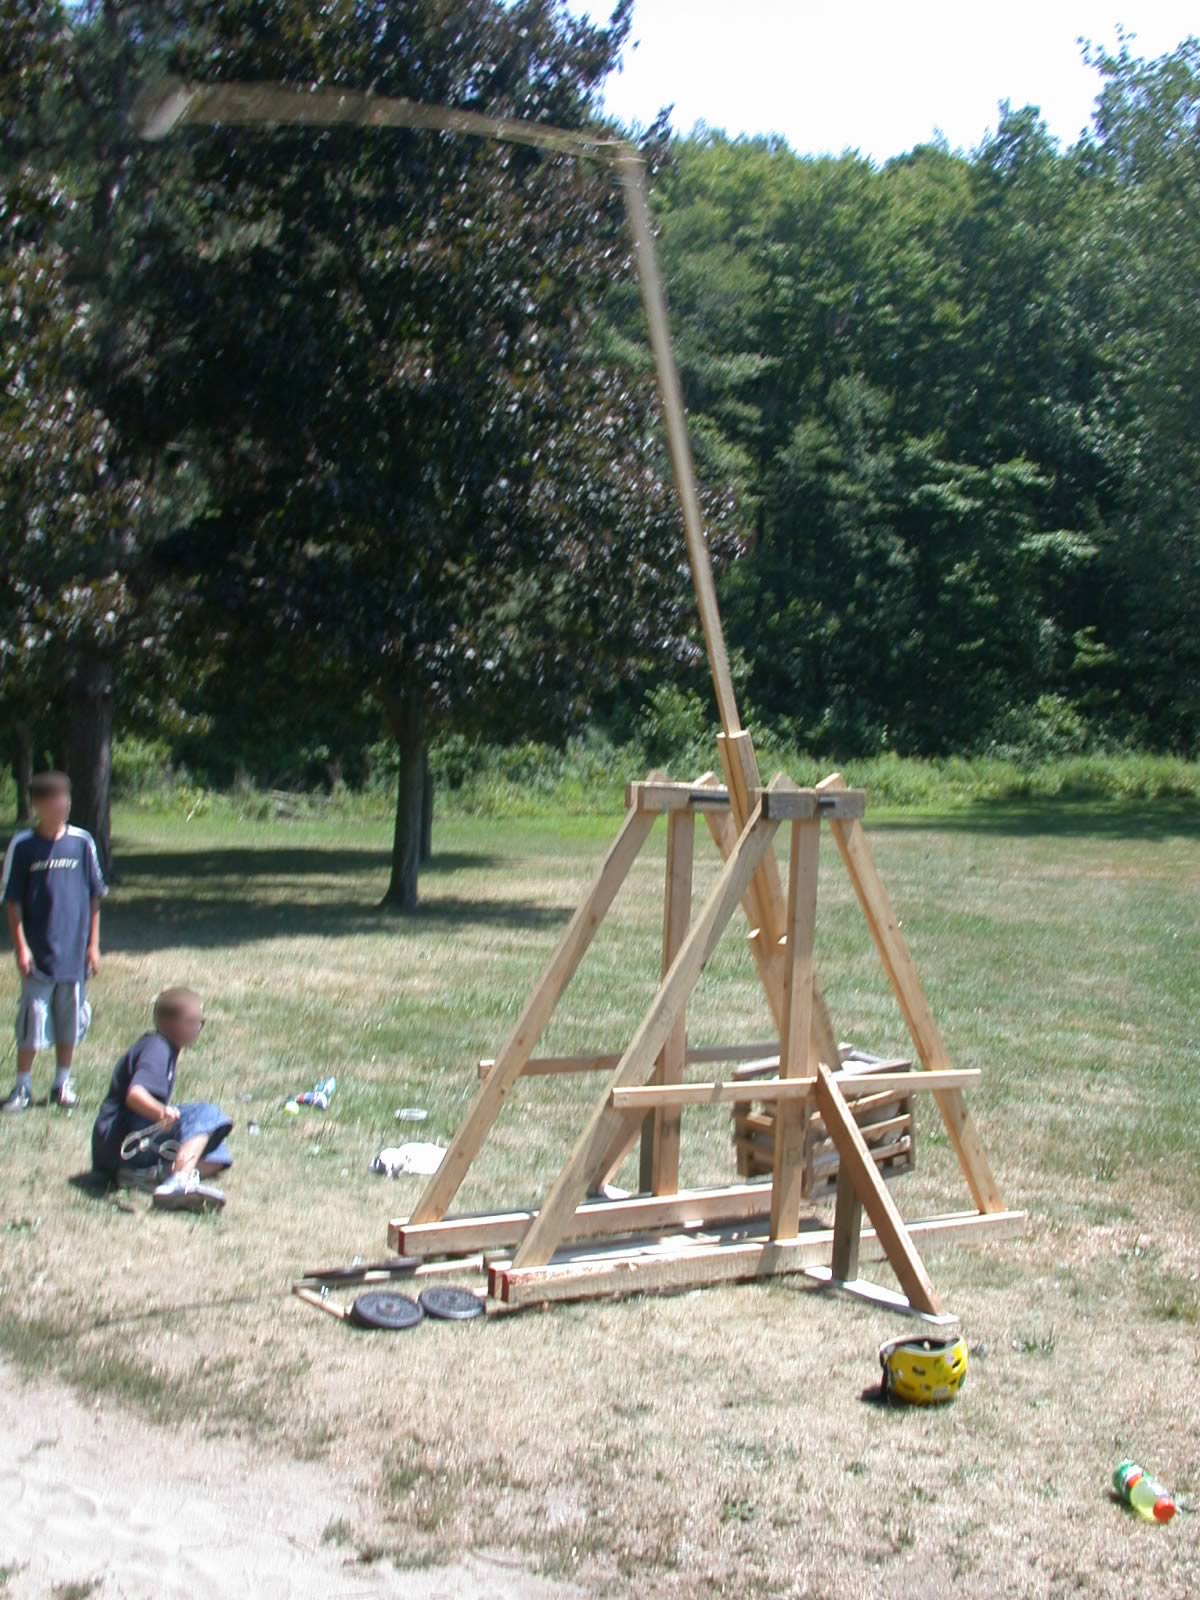 The trebuchet firing on L-Day |
